It’s not a secret that organic reach on Facebook and Instagram is declining. It’s more and more difficult to have satisfying results on these platforms without using a paid promotion. Of course, there are many ways in which you can boost your performance, like using relevant hashtags or starting cross-promotion with other Instagram creators. However, these organic methods of growing your account may not always be enough.
Ads are obviously another way of reaching a wider audience and growing your profile. Today we’ll guide you through easy ways to create (and later on analyze, as well) Instagram ads.
How to create Instagram ads directly from Instagram
The first way in which you can create an ad for Instagram is directly through the Instagram app.
You can do it in 2 ways:
- when you create a post (next to tagging other people and adding location),
- after your post is published, by using the “Promote” button under each post.
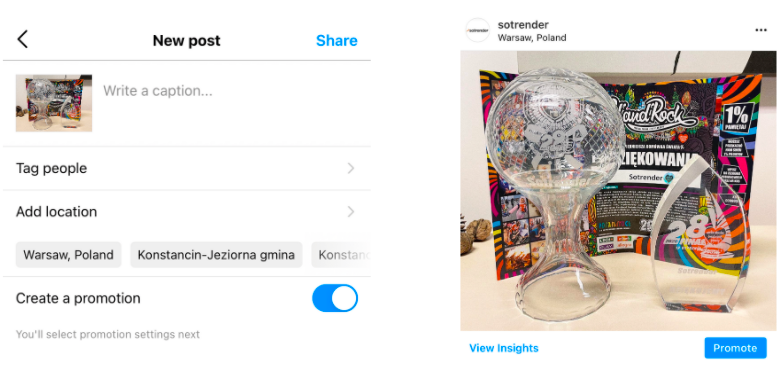
Instagram will guide you step-by-step and will tell you what, and how, you can change (remember that some settings will be set automatically unless you change them).
Here is what the process of creating your ad looks like in this case:
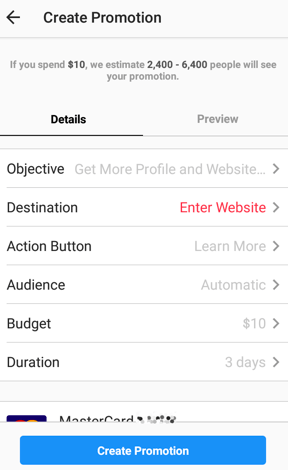
As we’ve mentioned, you can change all these settings manually, and as you can see it’s pretty easy to create your first ad.
Good to know
Once you’ve created your ads and they go live (which may take a while, as they have to be revised by Facebook), they will be labeled as sponsored. Every Instagram post can be boosted, promoted or sponsored, and the funny thing is all that means exactly the same thing. 😉

What you should know, though, is that by using this option you can choose only 2 objectives:
- Getting more profile/ website views
- Reaching people near your address
We’re presenting this method of setting up your Instagram ads because it’s the ‘classic’ and obvious way of doing it. However, the second method, which we’ll present below, is a much better choice when it comes to creating Instagram ads.
You might have heard that it’s not recommended to use the Promote button on Instagram (or the Boost Post button on Facebook). We couldn’t agree more with this recommendation! This is because the process in the Instagram app is simplified a lot – you can set a promotion easier and faster but you’ll be missing some targeting options and additional settings which you have when using Facebook Ads Manager.
Creating an Instagram ad via Facebook Ads Manager
If you’re familiar with Facebook Ads Manager, setting up your Instagram ad will be much easier, as the process is exactly the same.
Does that sound unfamiliar? You should know that Instagram is owned by Facebook, so these two platforms are treated as one ecosystem, and right now its name is Meta.
Before you start, you should obviously connect your Facebook Page with your Instagram profile.
You can either add your Instagram account to your Business Manager (here is a guide on how to do that) or connect your Instagram profile in the Page settings.
To help you understand the process of creating your ad, you should know that such a campaign consists of:
- Choosing an objective – Campaign level
- Setting the time frame, budget, target group, and placements – Ad set level
- Adding visual assets – Ad level
Remember
When you create your Instagram promotion you can have a few Ad sets, and a few Ads. However, one campaign can have only one objective, which has to be chosen at the very beginning.
Once you start creating your Instagram ad, you will immediately notice that you have many more objectives to choose from. When using Instagram you only had 2, but you have 11 options with Ads Manager.
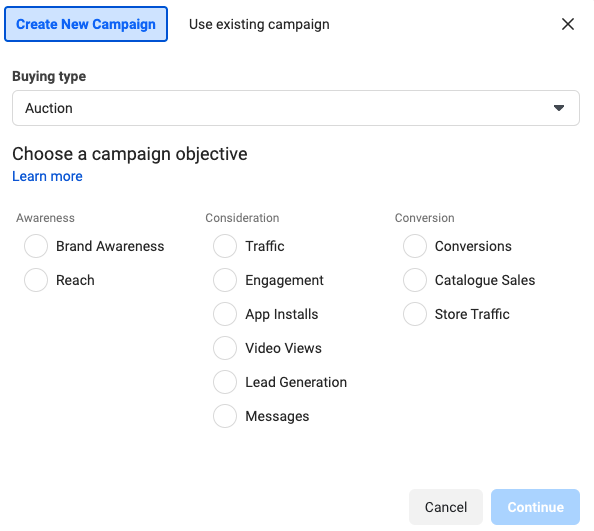
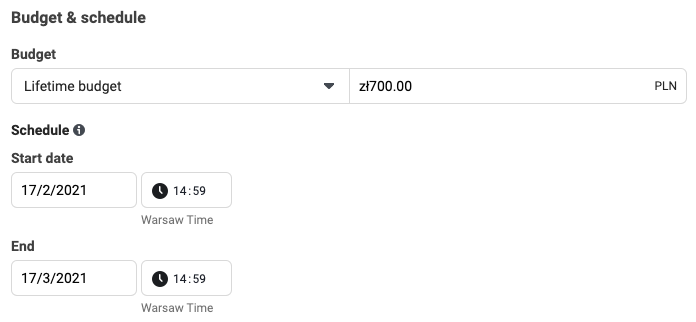
Once you choose an objective, you can move to defining the time frame of your campaign, budget, and people you want to reach.
Worth noting
You can set a lifetime budget or a daily budget. When you set the daily budget you have more control over your ads.
When it comes to the time frame of your campaign, though, you have to choose the start date, but you can leave the end date empty. Your campaign will be paused when your whole budget will be spent.
Defining your target audience is one of the most important elements of the whole campaign. There are thousands of interests (which may vary between countries) that you can choose from when deciding what groups of people you’d like to reach.
For example, these are:
- Hobbies and interests,
- Job titles,
- Demographic data (e.g. upcoming birthdays or anniversaries),
- Behaviour (e.g traveling patterns).
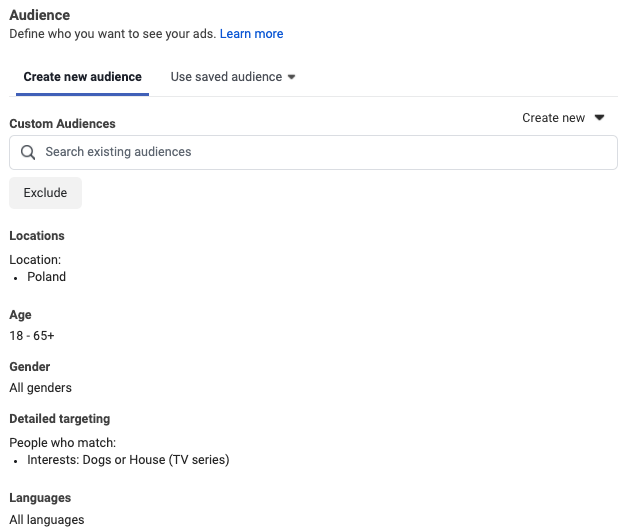
You can also import your own audience, for example, your current customers. To do so, you’ll need a CSV file with your customers’ email addresses, which you’ll need to import into Facebook. You can learn more about custom audiences, here. If you have a Facebook Pixel implemented on your website, you can also retarget people that visited your blog or ecommerce shop.
Right after selecting your audience comes the time you’ve been waiting for the most – creating your Instagram ad.
By default, Facebook will recommend you choose all the placements available. But you just want to create an ad for Instagram. What you have to do is change the placements from automatic to manual and choose Instagram (as shown below).
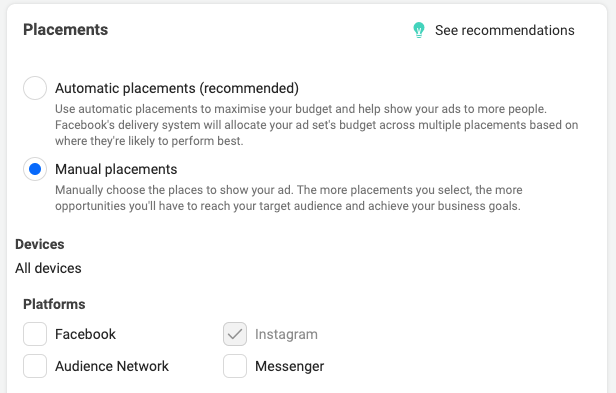
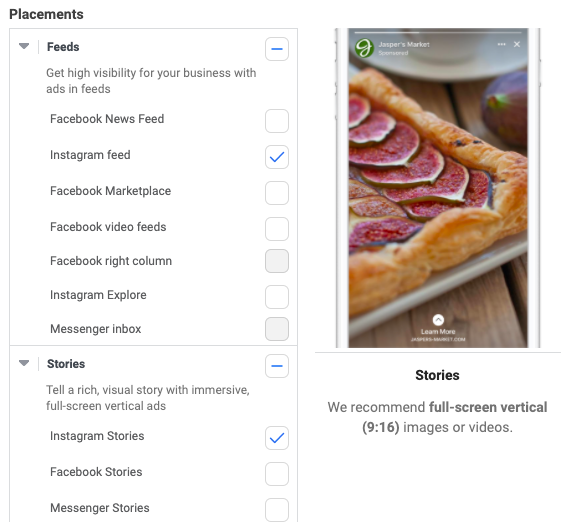
Then you can specify in which placements on Instagram you want your ad to be displayed. You have 3 options to choose from:
- Instagram feed,
- Instagram Explore Page,
- Instagram Stories.
Remember
If you’d like to choose all these 3 placements, you’ll have to prepare your visual assets in 2 different formats (one square for feed and explore and one rectangle for Stories). That also means that you’ll have to have 2 different ad sets (your target audience and other settings can remain the same) but you’ll need to create one ad set just for Instagram Story ads.
The last step, called ‘Ads’ is where you can upload your photo, video or graphic.
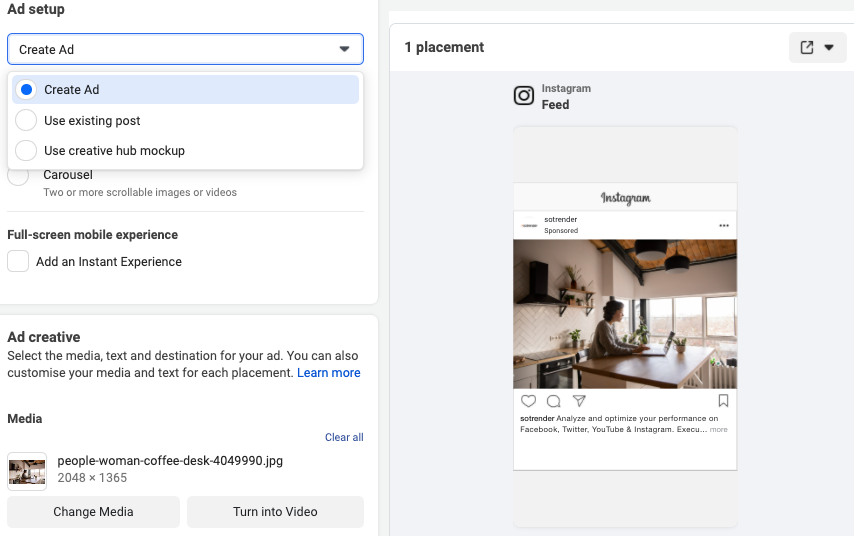
Here, you can either choose one of your existing posts or create a new one by uploading your visual asset, a copy, and a link.
Remember
If you add a new visual (photo/video) that will be your ad’s key visual, this “post” won’t be visible on your profile. It’s called a dark post, which only selected users will see in their feed (or Stories, depending on the placement you choose).
And it’s done! Now you just have to wait for the review process to end, and your ad will be scheduled or running, just as you planned.
Let’s sum up why Facebook Ads Manager is usually a better option when creating your Instagram ad than doing it directly from Instagram.
- You have 9 more objectives to choose from when creating your campaign (not only getting more profile/ website views or reaching people near you).
- You can be more precise when it comes to selecting your target audience.
- It’s easier to monitor and analyze ads – you can access your data on a desktop, analyze them in a table in a much more detailed way and for any time period, but also export all your metrics (as an XLS file) once the campaign is finished.
- You can create an Instagram Story ad, which you can’t set from Instagram.
- You can always edit your ad when it’s running – from changing the time period, budget, broadening (or narrowing) the target audience, even up to changing the copy of the ad or visuals you’ve used.
Analyze how your Instagram ad performed
You’ve done your job, so now it’s time to analyze how your campaign performed. And let’s make it clear from the beginning: analyzing your ads is a necessity.
As you most probably can guess, as you can set ads both from Instagram and Facebook Ads Manager, you can monitor your ads performance from these two places as well.
If you promoted a post that was previously published on your profile, you can analyze its performance by using the “View Insights” button under each post. You’ll see there some basic metrics presenting the performance of this post from the moment it was published.
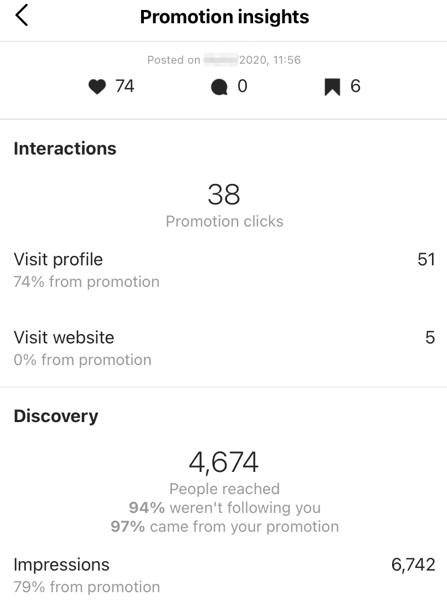
As we’ve mentioned above, setting up an ad via Ads Manager gives you the opportunity to analyze its performance in a much more convenient and detailed way. If you’ve set it via Instagram, you won’t be able to analyze it in Facebook Ads Manager – that’s quite obvious.
On the other hand, if you’ve used Ads Manager to create your Instagram ad, you can then also use it to monitor how it performed. Once you open Ads Manager, you’ll see a list of all the campaigns you’ve ever created. Usually, the ones that are active, or are the newest, will appear on top of the list (but not always).

Facebook offers dozens of different metrics that can be analyzed. Don’t get overwhelmed by them – you won’t be able to analyze all of them for each campaign, and you don’t even have to. Remember also that some of the metrics are available only for specific campaigns or ad types (for example there are many video-focused metrics, which you’ll be able to analyze only if one of your visuals is a video).
Remember
If a few days after switching your campaign on, you’re not happy with the first results, you can always implement necessary edits. In Ads Manager you’ll see all the metrics broken down day by day, so it’s much easier to draw conclusions.
External social media analytics tools
If you’ve just started using Ads Manager and you don’t have much experience with setting and analyzing Instagram ads, you should find external social media analytical apps helpful. One of them is Sotrender, which now lets you analyze both your organic and paid Instagram performance.
By using Sotrender – and specifically its latest Ads module – you’ll be able to:
- save time on gathering and visualizing data – at Sotrender all the ads-related metrics are automatically collected for you,
- analyze data that don’t exist in Facebook Ads Manager, e.g. audience share or sentiment,
- analyze all your data and key metrics on interactive charts which are auto-generated in real-time,
- generate Instagram ad reports in less than 60 seconds – you’ll receive your report in an editable PPTX file, so you can always tweak it afterward.

Sotrender is a great alternative not only for newbies but also for marketers that want to save time on repetitive tasks and optimize their everyday work.
Conclusion
Instagram ads are a very powerful tool for reaching new audiences and achieving your marketing goals. You should know now that to manage and optimize them effectively it’s much better to create your ads by using Facebook Ads Manager.
What could be our final piece of advice for you? Don’t focus only on the creative – your graphic or video – as defining your target audience precisely can sometimes have an even bigger impact on the final success of your campaign. To become a master of Instagram ads you need to run, optimize and test various settings many, many times to know what is actually working the best in your case.
Good luck! We hope you learned how to create Instagram ads more easily with our guide.
Read also:


